
Now that you have your Burner Bike it is time to prepare your ride for the Playa. Whether this is a virgin Burner Bike or a 10 year veteran check your bike and prepare now BEFORE YOU ARRIVE at Black Rock City to get your ride ready.
Minimum acceptable performance standard in Black Rock City. More is better but you must at least have these three things.
- Two inflated tires.
- One gear that pedals efficiently.
- One brake that works.
The best way to assess your bikes condition and what it needs is to put your bike in a workstand. You could just ride it around and test it but it is best to closely observe the mechanical action as you spin the wheels, pedal the crank, check the brakes, and inspect the chain. Many just flip the bike upside down and try to work on it that way but it is best mechanically and logically to keep the bike in the upright position. No workstand…no problem. Use an automobile bike rack and hang the bike on it. Or… find a piece of rope to make a “Poor Mans” bike rack. Wrap the rope around the nose of the saddle and make a secure knot. Throw the rope over a rafter, tree, branch, or other high object. Pull the rope and hoist the bike until the rear wheel is a foot off the ground then secure the rope so it doesn’t slip. The front wheel will stay on the ground but the rear is off and now you can pedal the bike.
Tubes & Tires
TUBES
Your bike tires have Inner Tubes that need periodic inflation. If your tubes have not been inflated periodically, like once a month, they will lose air. They may not be dead flat but they will be low and will need to be pumped up. Think about balloons hanging on the wall at a party. They are fully inflated on day 1 but each subsequent day they lose a bit of air, and after a week or two they are dead flat. Inner tubes are made of a similar porous rubber material but since they are constrained by the thickness of a tire they hold air pressure longer. Before you replace tubes or show up at Burning Man and think you need tubes put air in the tires. If they were fine last year they are probably fine this year as well, just pump them up. Unless you enjoy frustration Do Not use a small 5″ cheap frame mount pump that was $10 at the big box store. Use a floor pump with a gauge or an air compressor and a hand held pressure gauge. Check the sidewall of your tire and find the stamped recommended “PSI” (Pounds per Square Inch) inflation pressure. If you can’t read the tire pressure on the sidewall because the tire is worn out then it is time for a new tire. The narrower the tire the higher the PSI. Recommended PSI usually has a range of lets say 35-65 . The amount of air you put in is dependent on the type of riding you plan to do. Pavement riding means you want Max PSI and a hard ride which leads to minimal rolling resistance. Off road riding means you want a lower PSI and a softer ride so the tire can help conform to uneven terrain and provide a smoother more comfortable ride. Good rule of thumb for the Playa…inflate to 1/2 -2/3 s of recommended max pressure
TIRES
Inspect your tires for cuts. A cut tire is a relatively obvious problem to diagnose. Small cuts on the tread surface may be OK but any cut on the sidewall is more problematic. Cuts that begin to get bigger under tube inflation are a problem. If the cut expands and protrudes like a pimple ready to pop you need a new tire.
A more common Burner Bike problem is Dry Rot. Below from bottom to top is The Good, The Bad, & The Ugly.
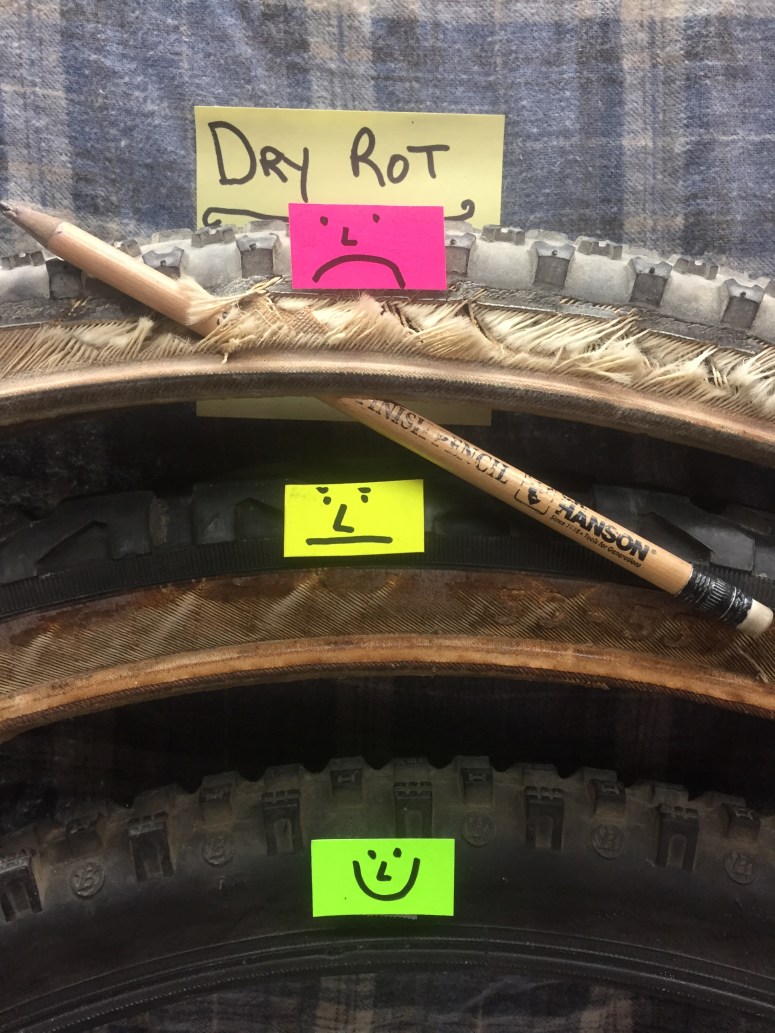
Dry Rotted tires are a very common occurrence, and a major problem on Burner Bikes. I replace dozens of tires every year at the Burn due to this problem. Dry rot does not happen over the short term so this will not happen to you at Burning Man… unless you arrive with rotted tires. Dry rot occurs due to years of exposure to sunshine and low humidity…umm kind of like desert conditions. The sidewall and tread surface dry up and decay to such a point that the structural integrity will no longer be strong enough to hold an inflated innertube. The tube will find a weak spot in the sidewall, spoog out, then EXPLODE with a BANG! This is called a “Blow Out”. Look at your tires under inflation before you get to the Burn. If they look like the bottom tire above with no cracking or fraying you are good to go. If they look like the middle tire with threads beginning to unravel and peel…you might make it through one more Burn, but then again you might not. See the tire on top with the pencil through it? Somebody brought this tire on their bike all the way out to Black Rock City. If your tire looks like the top one with the pencil through the sidewall replace it immediately because its useful life is over.
Wheels
Spin those wheels. Do they roll freely? If not you are rubbing on the brake pads or the bearings are too tight. Do they roll straight and “True” from left to right without rubbing the brake pads? If not they they need to be trued by someone that has some experience with a spoke wrench.
